Micro OLED Display
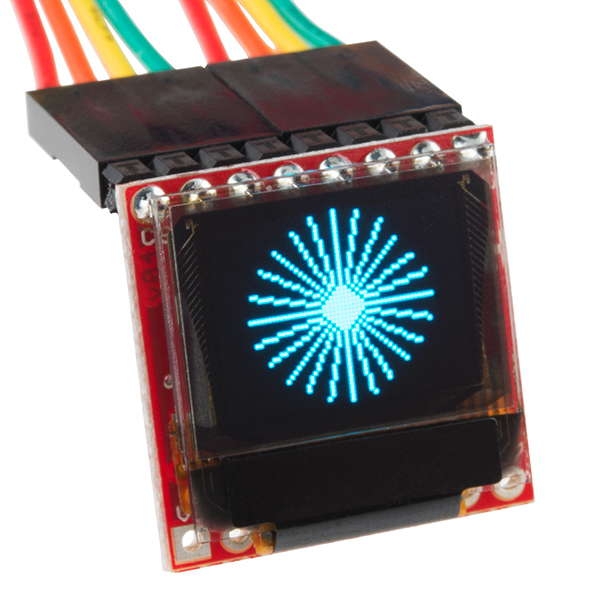
The Micro OLED display included in your Photon kit is a monochrome (single-color) screen that is 64 pixels in width and 48 pixels in height. It can be used to display text, simple graphics, or a combination. You can even create simple animations by drawing an object, leaving it on the screen briefly, erasing it, and repeating these steps with the object drawn at a new position on the screen.

Although the Micro OLED display is small, it can be useful for displaying information. Since the display is so small, design your information to be "glanceable" – a person should be able to very quickly and easily read and understand the information.
How to Connect Micro OLED
To connect the Micro OLED display to your Photon using the breadboard, you will need:
Micro OLED display
7 jumper wires (use different colors to help identify them)
The Micro OLED has pins located along the top edge of the display. There are labels for each pin printed on the underside of the Micro OLED circuit board.
If the pins along the top edge were numbered left to right as 1-8, the wiring connections would be:
OLED Pin
Photon Pin
Pin 1 – CS
A2
Pin 2 – RST
D6
Pin 3 – D/C
D5
Pin 4 – SDO
(None)
Pin 5 – SCK
A3
Pin 6 – SDI
A5
Pin 7 – 3V3
3.3V
Pin 8 – GND
GND
3.3V MAXIMUM: The Micro OLED display operates at 3.3V of power. Connect it to the 3.3V pin on your Photon, or connect it to a positive power rail that's connected to the 3.3V pin.
Do NOT connect it to VIN or V-USB because the higher voltage could damage the display.
TWIN PINS: Analog pins A2, A3, A4, and A5 are each represented by two pins on the Photon board. The duplicate pins are labeled as: SS/A2, SCK/A3, MISO/A4, MOSI/A5.
However, the Micro OLED has to connect to only one A2 pin – not both. The same goes for connecting the Micro OLED to the A3 and A5 pins.
The only limitation is that once you connect the Micro OLED, you will not be able to have a different part (such as an LED, etc.) connected to the other A2, A3, or A5 pins.
Here are the steps to connect the Micro OLED to your Photon using the breadboard:
Insert the 8 pins of the Micro OLED into different terminal strip rows on the breadboard. (Different terminal strip rows have different row numbers.)
Plug one end of a jumper wire into the same terminal strip row as the first OLED pin (CS). Plug the other end of this jumper wire into its corresponding pin on the Photon circuit board.
Repeat step 2 with the other jumper wires until each OLED pin is connected to its correct Photon pin. NOTE: The fourth OLED pin (SDO) will not be connected to anything.
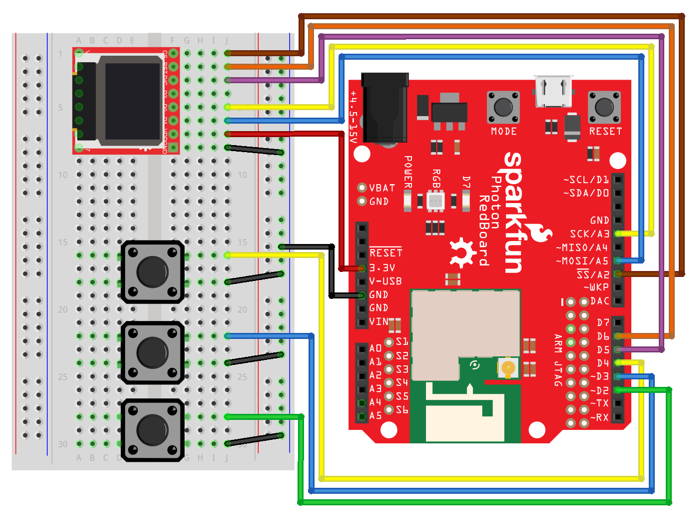
Here's a wiring diagram showing a possible way to connect a servo motor (ignore the wiring for the three push buttons):

Keep in mind that your connection can look different than this example diagram:
Your Micro OLED pins could be inserted into different row numbers on the breadboard. (The example connects the OLED pins to rows 1-8 on the right side of the breadboard.)
Your Micro OLED pins could be inserted into a different column of the breadboard. (The example connects the OLED pins into column F of the terminal strip rows.)
Your Micro OLED could connect (through jumper wires) to the other A2, A3, and A5 pins located on the lower left side of the Photon circuit board.
Your Micro OLED 3V3 pin could connect (through a jumper wire) either directly to the 3.3V pin or to a positive power rail connected to the 3.3V pin.
Your Micro OLED GND pin could connect (through a jumper wire) either directly to a GND pin or to a negative power rail connected to a GND pin. (There are three available GND pins.)
How to Code Micro OLED
The basic steps to control the Micro OLED display in your app code are:
Include the SparkFun Micro OLED library in your app.
Define the I/O pin numbers for certain Micro OLED pins.
Create a
MicroOLEDobject assigned to a global variable calledoled.Use the
oled.begin()method to start the display in thesetup()function.Use various
oledmethods to display text or simple graphics on the screen.
Include Library
Your Photon app must include a code library that will allow you to control the Micro OLED display.

In Particle Build, click on the Libraries icon to open the Libraries menu panel.
Type
oledinto the search field. Select the result called: SparkFunMicroOLEDClick the button to "Include in Project"
Select the title of your Photon app, and then click the "Confirm" button
Particle Build will automatically insert this #include statement at the beginning of your app code:
Global Variables
You need to define the I/O pin numbers for certain Micro OLED pins. This is similar to declaring global variables (except defined values are not allowed to change).
You will also need to create an object using the MicroOLED class in the included library, and assign this object to a global variable.
Add this code before the setup() function:
The first three lines of code define the I/O pin numbers for three specific OLED pins.
The fourth line of code creates a new object using the MicroOLED class, and assigns the object to a global variable named oled.
Start OLED in Setup
The oled.begin() method is used to start the Micro OLED display.
Add this code statement within the setup() function to start the OLED display:
The oled.begin() method will initialize the settings (including pin modes) for the Micro OLED and turn it on.
Display Text
Displaying text on the Micro OLED screen requires a sequence of five steps:
Clear the screen using the
oled.clear()method.Set the font type using the
oled.setFontType()method.Set the cursor position using the
oled.setCursor()method.Print text to the screen using the
oled.print()and/oroled.println()methods.Display the printed text using the
oled.display()method.
For example:
CREATE CUSTOM FUNCTION: Rather than listing all your OLED code statements within the loop() function, it may be better to create a custom function that contains all the code to display your text or graphics. Then call the custom function within the loop() function.
1. CLEAR SCREEN
To clear the screen before adding text or graphics:
2. SET FONT TYPE
The SparkFun Micro OLED library includes 4 available font types (numbered 0-3), which differ in font size and in which characters can be displayed:
Font Type
Font Size
Characters Allowed
Used For
1
8×16 pixels (6 columns by 3 rows)
any character on keyboard
General
2
10×16 pixels (5 columns by 3 rows)
only numbers and period
Numbers
3
12×48 pixels (5 columns by 1 row)
only numbers and colon
Numbers or Time
By default, the Micro OLED will be set to font type 0 by the oled.begin() method.
You can use the oled.setFontType() method to set the font type by including the font type number within the parentheses:
You can use a mix of different font types by setting a new font type before printing a new line of text.
For example:
3. SET CURSOR POSITION
The cursor position represents the starting position for printing text to the screen. The cursor can be set to any (x,y) position on the screen. The OLED screen is 64 pixels wide by 48 pixels tall:
The
xpositions are numbered left to right as 0-63The
ypositions are numbered top to bottom as 0-47
For example, to have your text start at the top-left corner of the screen:
As you print text to the screen, the OLED display will automatically move the cursor position, so the next text printed to the screen will start at the next available screen position.
However, if desired, you can adjust the text layout by setting a new cursor position before printing a line of text, so the new text will start at a specific position on the screen.
For example:
4. PRINT TEXT
The oled.print() and oled.println() methods can be used to print text (or variable values) to the screen. Text that is longer than the screen column width will automatically wrap to the next line.
Print Text Within Quotation Marks
To print text directly, include the text inside the method's parentheses by listing the text within double quotation marks:
Print Value of Variable
To print the value stored in a variable, include the variable name inside the method's parentheses.:
In this case, myName is a variable name (presumably a person's name). Change this to the name of your variable, which could store a text string or number.
Print Decimal Value to Certain Number of Digits
If a variable stores a decimal number (data type is float or double), you have the option of indicating how many digits after the decimal point to show when printing the variable's value:
In this case, roomTemp is a variable name that stores a decimal value (presumably a temperature sensor measurement). Its value will be displayed to 1 digit after the decimal point. So if the actual variable value were 70.1584275, it would be printed on the screen as: 70.2 (the last digit is automatically rounded up if necessary).
PRINT vs. PRINTLN
There are two different print methods that can display text on the Micro OLED screen:
oled.print()will print text to the screen, but the cursor will remain on the same line. The next text printed to the screen will start where the last text ended.oled.println()will print text to the screen, and then move the cursor to the start of a new line. The next text printed to the screen will start on the new line.
The oled.print() command is useful for combining text and variable values on the same line.
For example, if you had a variable named hour that stored the hour of the current time and another variable named minutes that stored the minutes, you could combine these together on the screen:
Notice that the last code statement used the oled.println() method to move the cursor to a new line for any text that might be printed after the time.
Print Blank Line
To add a blank line, just use the oled.println() method without anything inside its parentheses:
5. DISPLAY SCREEN
Any text or graphics will NOT be shown until the OLED is instructed to display the screen:
GLANCEABLE: Because the Micro OLED display is small, be sure your text and graphics will be "glanceable" – a person should be able to quickly and easily understand the information.
Display Graphics
Displaying simple graphics on the Micro OLED screen requires a sequence of three steps:
Clear the screen using the
oled.clear()method.Draw graphics (dots, lines, rectangles, circles) on the screen using various methods.
Display the graphics using the
oled.display()method.
For example:
Rather than listing all these code statements within the loop() function, you may want to create a custom function that contains all the code to display your graphics. Then you can call this custom function within the loop() function.
The following drawing methods are available:
oled.pixel()can be used to draw a dotoled.line(),oled.lineH(), andoled.lineV()can be used to draw a lineoled.rect()andoled.rectFill()can be used to draw a rectangleoled.circle()andoled.circleFill()can be used to draw a circle
Each drawing method requires parameters for the (x, y) pixel position of a point (or two points if drawing a line). The OLED screen is 64 pixels wide by 48 pixels tall:
The
xpixel positions are numbered left to right as 0-63The
ypixel positions are numbered top to bottom as 0-47
DRAW DOT
The oled.pixel() method can be used to draw a dot (pixel) at a specific point:
For example, to draw a dot at the center of the screen:
DRAW LINE
The oled.line() method can be used to draw a line from one point (x1, y1) to another point (x2, y2):
For example, to draw a line from the top-left corner (0,0) to the bottom-right corner (63, 47):
DRAW HORIZONTAL LINE
The oled.lineH() method can be used to draw a horizontal line that starts from a specific point (representing the left end of the line) and has a specified width:
For example, to draw a horizontal line that starts at (12, 24) and has a width of 40 pixels:
DRAW VERTICAL LINE
The oled.lineV() method can be used to draw a vertical line that starts from a specific point (representing the top end of the line) and has a specified height:
For example, to draw a vertical line that starts at (32, 9) and has a height of 30 pixels:
DRAW OUTLINE OF RECTANGLE
The oled.rect() method can be used to draw an outline of a rectangle that starts from a specific point (representing the top-left corner of the rectangle) and has a specified width and height:
For example, to draw an outline of a rectangle with its top-left corner at (12, 14) with a width of 40 pixels and a height of 20 pixels:
DRAW FILLED RECTANGLE
The oled.rectFill() method can be used to draw a solid (filled) rectangle that starts from a specific point (representing the top-left corner of the rectangle) and has a specified width and height:
For example, to draw a filled rectangle with its top-left corner at (12, 14) with a width of 40 pixels and a height of 20 pixels:
DRAW OUTLINE OF CIRCLE
The oled.circle() method can be used to draw an outline of a circle that has its center at specific point and has a specified radius:
For example, to draw an outline of a circle with its center at (32, 24) and a radius of 20 pixels:
DRAW FILLED CIRCLE
The oled.circleFill() method can be used to draw a solid (filled) circle that has its center at specific point and has a specified radius:
For example, to draw a filled circle with its center at (32, 24) and a radius of 20 pixels:
DRAW WITH BLACK (ERASING)
By default, all the drawing methods will draw using "white" pixels (which are actually light blue on your Micro OLED screen). However, you can modify each method to draw using black pixels instead, which represents erasing.
Any of the drawing methods can be modified to draw using black pixels by adding BLACK, NORM as the last two parameters inside the method's parentheses.
For example, to draw a black dot:
For example, to draw a black line:
For example, to draw solid (filled) black circle:
The black pixels will only be visible if drawn on top of a white shape, so the black pixels are erasing white pixels.
For example, this code draws a white filled circle with its center at (32, 24) and a radius of 20 pixels, and then draws a black filled circle that also has its center at (32, 24) but with a radius of 10 pixels:
By drawing the black circle after the white circle, the black circle will erase part of the white circle.
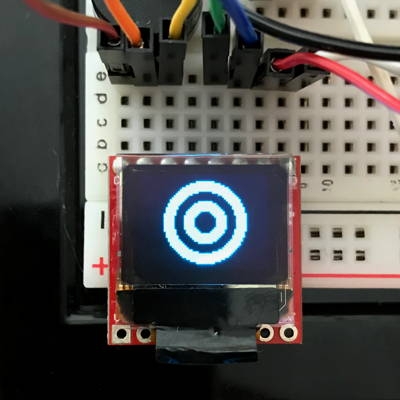
You can also create more complex patterns by drawing a series of white and black shapes, such as:
This example code draws 4 filled circles that have the same center point but a different radius:
First, a white filled circle with a radius of 20 pixels is drawn.
Then, a black filled circle with a radius of 15 pixels erases part of the white circle.
Then, a new white filled circle with a radius of 10 pixels is drawn that fills part of the black circle.
Finally, a new black filled circle with a radius of 5 pixels erases part of the second white circle.
The overall pattern ends up looking like a "target" symbol:

SIMPLE ANIMATIONS
You can also create simple animations by drawing something (with white pixels), leaving it on the screen briefly, erasing it (with black pixels), and then changing its position on the screen. A for loop can be used to repeat the "animation" for a certain number of times.
For example, here is code for a simple animation that makes a circle "bounce" back and forth on the screen. The code inside each for loop draws and displays a white filled circle, leaves the circle on the screen for a brief delay(), and then erases the circle (by drawing and displaying a black filled circle of the same size at the same position).
The first for loop increases the x-position of the circle's center from 10 to 53, which slowly moves the circle across the screen from left to right. The second for loop decreases the x-position of the circle's center from 53 to 10, which moves the circle from the right back to the left.
Display Text + Graphics
You can also combine text and graphics on the OLED screen at the same time. For example:
The Micro OLED display is only 64 pixels in width by 48 pixels in height. Use this limited screen space effectively by designing your text and graphics to be "glanceable" – a person should be able to very quickly and easily read and understand the information.